Azzurri Limited
| Constructing high-quality business solutions | Azzurri Limited |
|
| Home | Services | Software | Inquiries | Company |
|
|
Clay Quick Start Guide
Create a ProjectYou can skip this step if you have an existing project where you want to create the database model. Create a project as follows: From the Eclipse menu, choose File > New > Project... to bring up the New Project wizard. On the left, select Simple, and on the right select Project; then click Next. In the Project name field, type your name as the name of your new project. Do not use spaces or special characters in the project name (e.g., "JaneQuser"). Click Finish when you are done. If you have just installed Eclipse, you may want to read the Workbench User Guide - Basic Tutorial to familiarize yourself with the basic elements of the Workbench. need to create a project. From the Eclipse menu, choose Help > Help Content to bring up the online help. The rest of this Quick Start Guide will explain Clay Database Modeling functionality only. Create a Database ModelTo start using Clay, you need to create a new database model. From the Eclipse menu, choose File > New > Other... You will see a list of available wizards similar to the image below. Open Database Modeling and select Azzurri Clay Database Design Diagram.
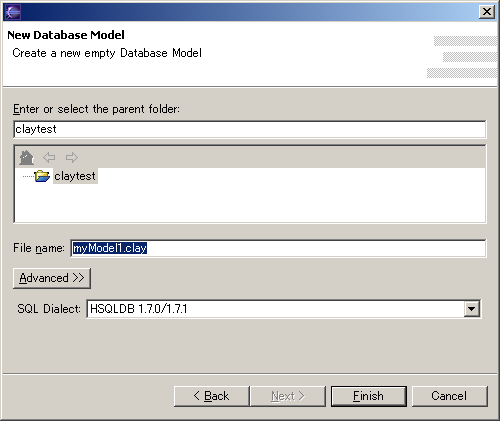
Select the folder where you want to create the database model.
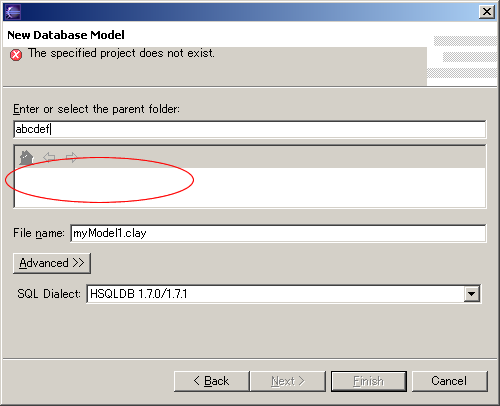
Note that you can only select parent folders that exist in the Eclipse workspace. After selecting the folder where you want to create the database model, enter a File name that ends with the .clay extension, select the SQL Dialect you want to use from the list of available dialects, and press Finish.  Troubleshooting: "The specified project does not exist"If you cannot select a folder from the list because the list is empty, and the wizard gives you a "The specified project does not exist" error when you type a parent folder, you may need to create a project first.
To create a new project, close the New Database Model wizard, and select File > New > Project... from the Eclipse menu. Choose either Simple project or Java project, both will work fine. After creating a project, try the above step again. The Database Model Graphical EditorWhen a new database model file was successfully created in the workspace, or when you double-click a database model file (a file with a .clay extension), Eclipse will open the Database Model Graphical Editor as shown below. 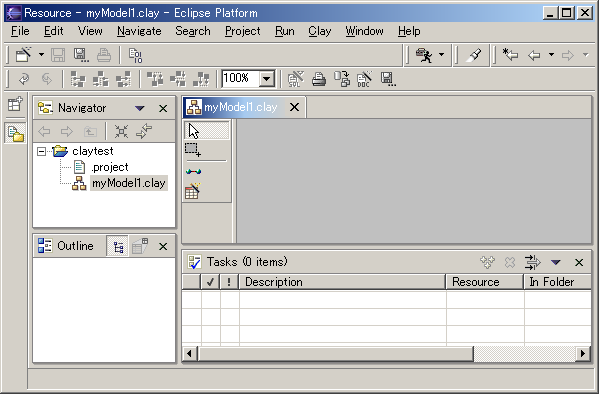
Editing TablesUse the palette on the side of the Database Model Graphical Editor to add tables to the model.
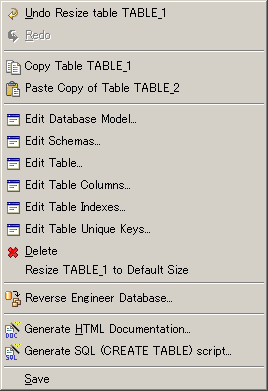
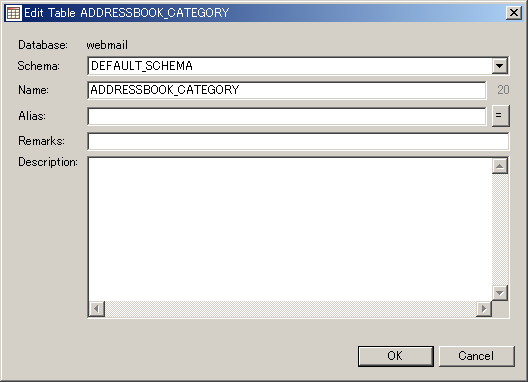
Selecting any of the Edit Table menu items will bring up a dialog. Editing Table PropertiesTo edit some general table properties, select Edit Table... from the popup menu to bring up the Edit Table dialog below.
In the Edit Table dialog, you can use the Schema drop-down list to select the schema of this table from the list of available schemas in this database model. The Name field is where you can change the name of the table, as it will be used in the generated SQL. Note the label on the right of this field, showing the length of the table name. Some SQL dialects have length restrictions, and this label will assist you in obeying these restrictions. The Alias field is currently not used. Specifying a value here will not affect the generated SQL or the generated HTML documentation. Use the Remarks field to enter documentation for the
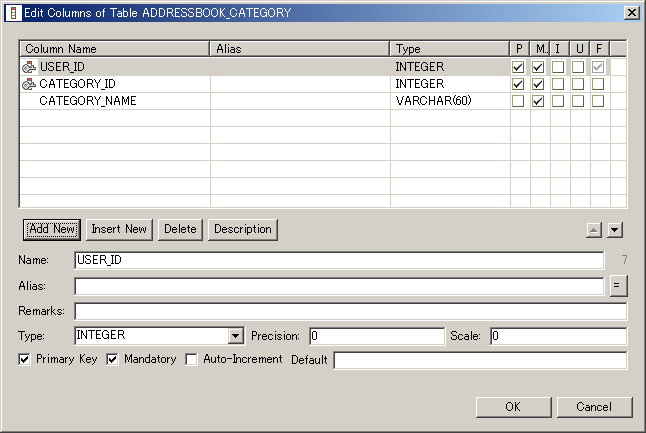
table that will be part of the generated SQL in the form of In the Description text area you can enter documentation for the selected table. This documentation will not be part of the generated SQL, but will be in the generated HTML documentation. Editing Table ColumnsFor example, to add, remove and edit table columns, either double-click a table figure in the Database Model Graphical Editor or right-click a table figure and select Edit Table Columns from the popup menu to bring up the Edit Columns dialog below.
The table view in the upper half of this dialog shows all columns of the table we are editing. The Add New, Insert New and Delete
buttons allow you to add a new column to the bottom of the list, insert
a new column before the currently selected column in the list, or delete
the currently selected column in the list, respectively. The Description
button brings up a separate dialog where you can enter documentation for
the selected column. This documentation will not be part of the generated
SQL, but will be in the generated HTML documentation. The up The Name field is where you can change the name of the column, as it will be used in the generated SQL. Note the label on the right of this field, showing the length of the selected column name. Some SQL dialects have length restrictions, and this label will assist you in obeying these restrictions. The Alias field is currently not used. Specifying a value here will not affect the generated SQL or the generated HTML documentation. Use the Remarks field to enter documentation for the
selected column that will be part of the generated SQL in the form of
The Type combobox shows only the data types that are supported by the selected SQL dialect. In the Precision field you can specify the length or
size of the column for columns that have a character data type (e.g. In the Scale field you can specify the number of fractional
digits for numeric data types. For example, a column with data type The Primary Key checkbox indicates whether the selected column is part of the primary key of this table. A primary key may have more than one column, and you can see which columns are part of the primary key in the table view in the upper half of the dialog: all columns that are part of the primary key will have their P column checked. The Mandatory checkbox indicates the nullability of
the selected column. A column that is marked as mandatory is not nullable,
and the generated SQL will usually contain the phrase The Auto-Increment checkbox indicates a column that
is intended to be a unique identifier column. In some SQL dialects, such
columns are referred to as In the Default field you can specify the default value
that a columns should have if you issue an In the table view at the top of this dialog, there are some fields whose names are abbreviated. These fields are explained below:
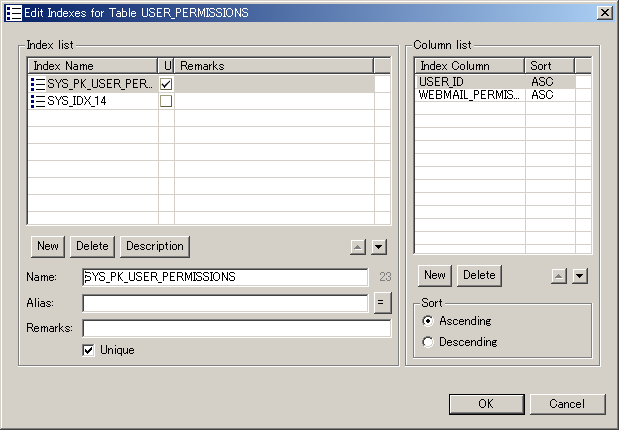
Editing Table IndexesTo edit the indexes of the selected table, select Edit Table Indexes... from the popup menu to bring up the Edit Table Indexes dialog below.
A table can have several indexes. Each of these indexes can have several index columns. The left-hand side of the Table Indexes dialog presents a list of the indexes for this table. Use the Add button to add a new index to the list, or the Delete button to remove the selected index from the list. Changing the selection to a different index in the left-hand list of table indexes will change the contents of the right-hand index column list, as well as the content of the Name, Alias, Remarks and Unique fields in the lower part of the dialog. You can use these fields to change the properties of the selected index in the table indexes list in the top left of the dialog. The Name field is where you can change the name of the index, as it will be used in the generated SQL. Note the label on the right of this field, showing the length of the selected index name. Some SQL dialects have length restrictions, and this label will assist you in obeying these restrictions. The Alias field is currently not used. Specifying a value here will not affect the generated SQL or the generated HTML documentation. Use the Remarks field to enter documentation for the
selected index that will be part of the generated SQL in the form of The Description button brings up a separate dialog where you can enter documentation for the selected index. This documentation will not be part of the generated SQL, but will be in the generated HTML documentation. Use the Unique checkbox to indicate whether the selected
index should be marked as unique, in which case the generated SQL will
use the The up The right-hand side of the Table Indexes dialog presents a list of the index columns for the selected index in the left-hand list. Use the Add button to add a new index column to the list. This will bring up a list of all the columns in the table that have not been added to the index yet. Use the Delete button to remove the selected index column from the list. Editing Unique KeysTo edit the indexes of the selected table, select Edit Table Unique Keys... from the popup menu to bring up the Edit Table Unique Keys dialog below.
A table can have several unique keys. Each of these unique keys can have several columns. The left-hand side of the Table Unique Keys dialog presents a list of the unique keys for this table. Use the Add button to add a new unique key to the list, or the Delete button to remove the selected unique key from the list. Changing the selection to a different unique key in the left-hand list of table unique keys will change the contents of the right-hand unique key column list, as well as the content of the Name, Alias, and Remarks fields in the lower part of the dialog. You can use these fields to change the properties of the selected key in the unique keys list in the top left of the dialog. The Name field is where you can change the name of the unique key, as it will be used in the generated SQL. Note the label on the right of this field, showing the length of the selected unique key name. Some SQL dialects have length restrictions, and this label will assist you in obeying these restrictions. The Alias field is currently not used. Specifying a value here will not affect the generated SQL or the generated HTML documentation. Use the Remarks field to enter documentation for the
selected unique key that will be part of the generated SQL in the form
of The Description button brings up a separate dialog where you can enter documentation for the selected unique key. This documentation will not be part of the generated SQL, but will be in the generated HTML documentation. The up The right-hand side of the Edit Unique Keys dialog presents a list of the unique key columns for the selected unique key in the left-hand list. Use the Add button to add a new unique key column to the list. This will bring up a list of all the columns in the table that have not been added to the unique key yet. Use the Delete button to remove the selected unique key column from the list.
SQL DialectsSQL (Structured Query Language) is a standardized language for defining and manipulating data in a relational database. Even though SQL is standardized, there are small differences between SQL statements for different databases. Every database can be said to speak its own dialect of the SQL language. Differences between SQL dialects are especially noticable in the DDL (Data Definition Language) statements that are used to create or destroy database objects like tables, views and indexes. One of the design goals of Clay is to provide transparency between dialects, so that the same database model can be used with many different database engines. At the same time, Clay should not make it impossible to leverage special features and strengths of each database. Data TypesOne of the areas where SQL dialects differ is in the data types they support. Note that in the Edit Columns dialog, the Type combobox contains only the data types available in the SQL dialect you selected when you created the model.
Changing the SQL Dialect of the Database ModelTo change the SQL dialect of the model, right-click on the gray background between the table figures to bring up the popup menu as shown below.
Select Edit Database Model to bring up a dialog where you can edit the database model properties, including the SQL dialect of the model. Note that changing the SQL dialect of a database model does not migrate the data types of the model. If the model uses data types that were supported in the original SQL dialect, but are not supported in the new SQL dialect, you need to manually change these data types. Creating Foreign KeysTo create a foreign key relationship between two tables, select the Foreign Key Reference tool in the palette on the side of the Database Model Graphical Editor and draw a reference between the tables.
Select the Foreign Key Reference tool, click on the table you want to add the foreign key to, and drag the mouse to the parent table. The mouse cursor will change when you drag over a table figure, indicating that you can connect this table by releasing the mouse. Release the mouse over the target parent table to create the foreign key relationship. Auto-migration of Foreign KeysClay will automatically migrate the primary key columns of the parent table to become foreign key columns in the child table when you draw a reference between two tables. The foreign key columns and reference join will also be modified if the primary key columns or reference are modified. Clay applies the following rules for auto-migrated columns:
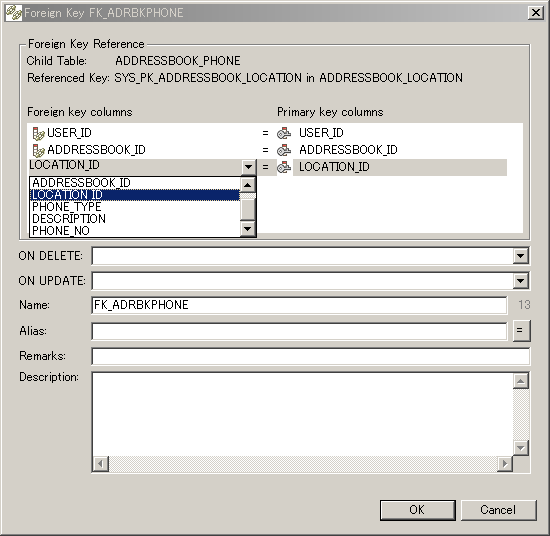
Editing Foreign KeysThe Edit Foreign Key Dialog allows you to change the properties of a foreign key relationship between two tables. There are three ways to bring up the Edit Foreign Key Dialog.
As you can see in the image above, you can use this dialog to select the Foreign key columns in the child table that are mapped to the Primary key columns in the parent table. Also, you can specify the Name of the foreign key and specify Remarks for databases that support comments on foreign keys. Finally, you can use the ON DELETE and ON UPDATE fields to select the actions supported by the selected SQL dialect. Reverse EngineeringYou can use Clay to build a new database model, but you can also reverse engineer an existing database to visualise its structure. There are several ways to start the Reverse Engineer Wizard.
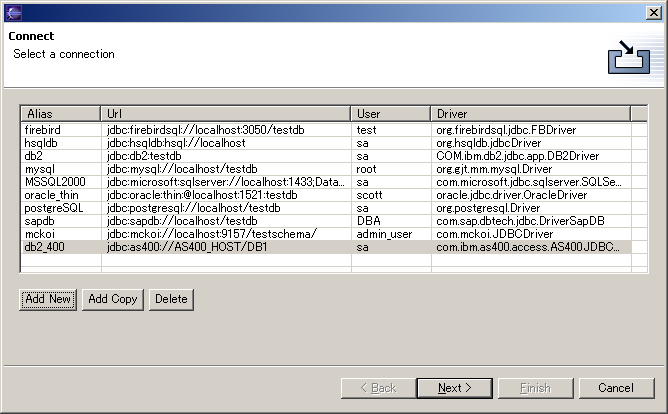
Clay uses JDBC to connect to a database and read its structure. To reverse engineer a database, you need to create a connection profile. The first page in the Reverse Engineer Wizard is the list of connection profiles you created earlier. This list is persisted between sessions, so the next time you use Clay to reverse engineer a database, the connection profiles you created will still be in this list.
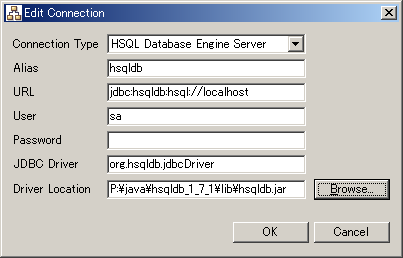
To create a new connection profile, click the Add New button. This will bring up the Edit Connection Dialog. Clicking the Add Copy button will create a new connection profile that has the same properties as the connection profile that is selected in the list. The Edit Connection Dialog is shown below.
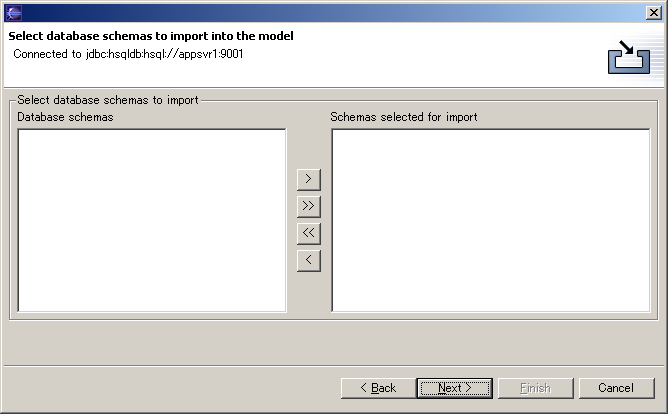
The Connection Type field is a convenience field to save some typing. This drop-down list contains connection profile templates for a number of databases. Selecting a template from the list will fill the other fields with the values from the template. The Alias field is the name for your connection profile. Every connection profile should have a unique name. The URL is the JDBC connection url. The User field is the user name to use to connect to the database. The Password field is the password to use to connect to the database. Use the JDBC Driver field to specify the class name of the JDBC driver. In the Driver Location field, specify the full path of the JAR file or ZIP file of the JDBC driver, or the full path of the folder where the JDBC driver classes are located. Workaround: If your JDBC driver consists of multiple JAR files, you need to load all of them one by one. Specify the first JAR file in the Driver Location field, click OK to close the Edit Connection Dialog, and click Next in the Reverse Engineer Wizard. The wizard will probably give an error saying that it cannot find a certain class. Go back to the first page of the Reverse Engineer Wizard, open the Connection Profile Dialog again, and specify the second JAR file. Click OK to close the dialog, and press Next in the Reverse Engineer Wizard again, until you have loaded all the JAR files of the JDBC driver. You can also create a separate connection profile for each of the JAR files of the JDBC driver. Clicking the Next button in the Reverse Engineer Wizard will show the available database schemas in the second page of the Reverse Engineer Wizard as shown below.
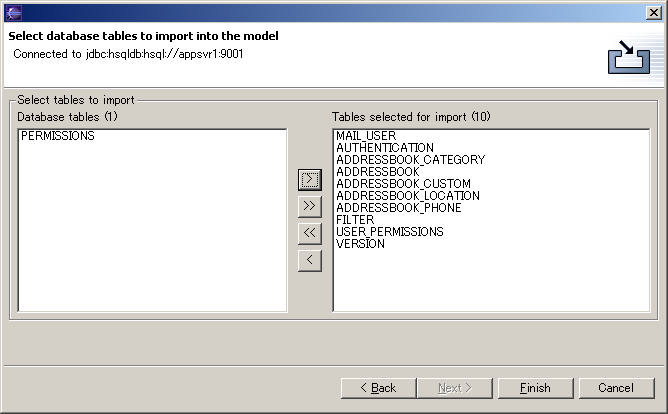
For databases that do support schemas, the left-hand side of the schemas page shows the list of available schemas in the database that you have connected to. You can choose the schemas to import by selecting schemas in the left-hand list, and clicking the > button to move them to the right-hand list. The right-hand list is the list of schemas that are selected. The >> button moves all the schemas from the left-hand list to the right-hand list. Some databases, like for example HSQLDB, do not support schemas. In that case, the database schemas page is empty, and you can simply press the Next button to go to the next page where you can select the tables to import. The third page of the Reverse Engineer Wizard shows the available database tables you can choose to import into your database model, as shown below.
The left-hand side of the tables page shows the list of available tables in the schemas that you selected to import from database that we are connected to. You can choose the tables to import by selecting tables in the left-hand list, and clicking the > button to move them to the right-hand list. The right-hand list is the list of tables that are selected. The >> button moves all the tables from the left-hand list to the right-hand list. Click the Finish button to start reverse engineering the selected tables. This will import the selected tables, and all the associated foreign keys, indexes and unique keys into the database model. Generating SQL (DDL)Clay can generate a script with the SQL statements to create the objects selected in the database model. This type of SQL statements is often called DDL or Data Definition Language statements, as opposed to DML or Data Manipulation Language statements. The SQL script will use the syntax and features of the SQL dialect selected in the database model. To generate the SQL script, first bring up the Generate SQL Wizard, with one of the following actions:
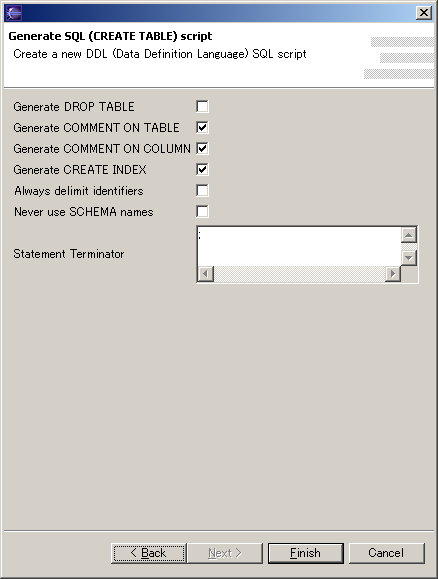
This will bring up the Generate SQL Wizard. In the first page of the Generate SQL Wizard, you can select the Parent folder where the SQL script should be saved, and the File name you want to give it. Click Next in the first page to go to the second page, shown in the image below.
In the second page of the Generate SQL Wizard, you can customize the generated script with the following options:
Click Finish to generate the SQL script to the location you specified. Database Model ValidationEvery time you save the database model, Clay will verify the rules of the selected SQL dialect. Any problems are displayed in the Tasks view (Eclipse 2.1) or in the Problems view (Eclipse 3.0). You can double-click on a problem, or right-click to bring up a popup menu and select Go To to bring up the edit dialog where you can fix the problem, as shown in the image below.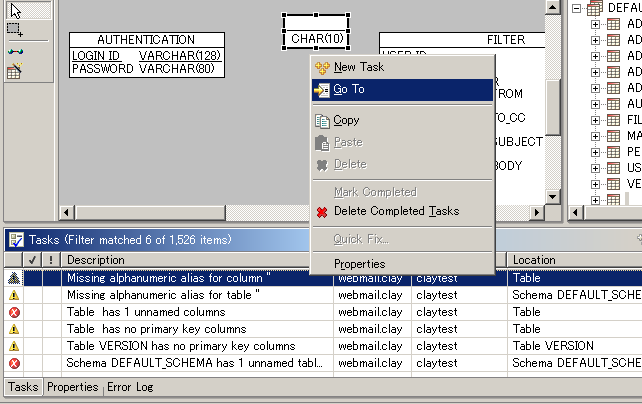
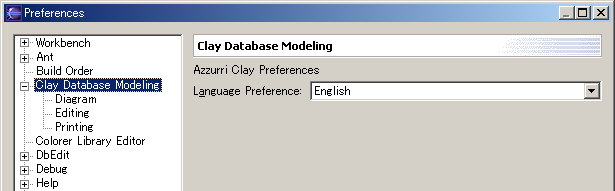
PreferencesFrom the Eclipse menu, choose Window->Preferences to open the Preferences dialog. Choose Clay Database Modeling from the left-hand list to get to the preferences page for this plugin. General PreferencesIn the general preference page, you can select the display language of the dialogs and messages.
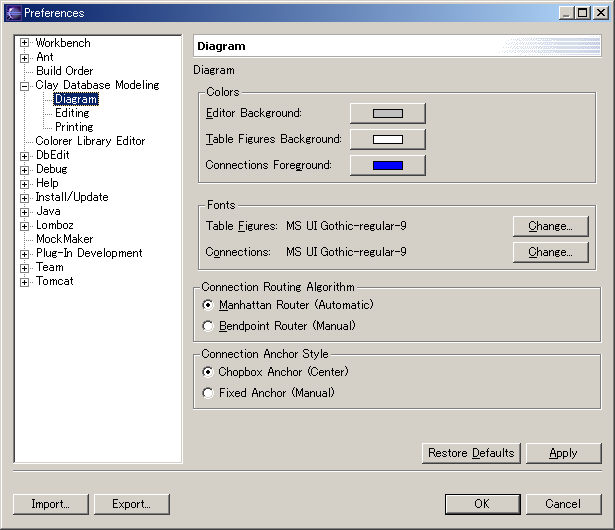
Diagram PreferencesHere you can select display fonts and colors used in the diagram. Also, you can specify the Connection Routing Algorithm and the Connection Anchor Style.
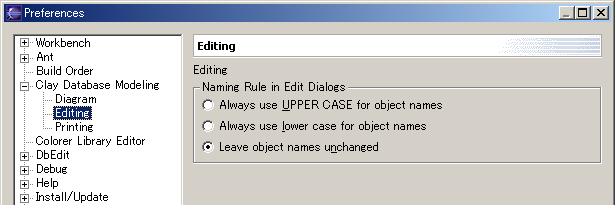
Editing PreferencesUse the Naming Rule radio buttons to select your preference on whether the names of tables, columns and other database model objects should always be in uppercase, lowercase, or if mixed case is allowed.
|
| Home | Services | Software | Inquiries | Company |